
This article was translated from German. Despite our care, some technical terms may be imprecise. The German version is authoritative.
Hardly a pocket watch left Wilhelm Schultz’s bench after repair without a pivot being repolished. Either it bound in the jewel hole and had to be made a little thinner, or the constant friction in its bearing had robbed it of its high polish – this applied above all to the balance pivots. Simple as the work looks, Schultz warned that it takes a great deal of experience to avoid a mistake that makes the watch’s rate worse. He considered two things decisive: knowing one’s own Jacot tool exactly, and preparing the pivot burnishers correctly. (The German name, Zapfenpolierfeile, means a polishing file for pivots.)
The right bed in the Jacot tool
The beds of the Jacot tool are numbered. Ideally, a pivot polished on bed 12 until the burnisher no longer bites will then measure exactly 12 Grad on the pivot gauge (Grad: the unit of the gauge’s scale). Schultz knew that this is seldom true of every bed. And after some years the most-used beds have worn so far that pivots polished there remain a full Grad thicker than at first.
From this follows his rule: a pivot that is only to be repolished, not made thinner, belongs on an exactly fitting bed. Even if it has to be polished ½ or 1 Grad thinner, one takes only a very slightly smaller bed. If the pivot stands too far out over the bed, the burnisher lies askew, and the pivot becomes thicker at the back, at the shoulder, than at the front, at its end.
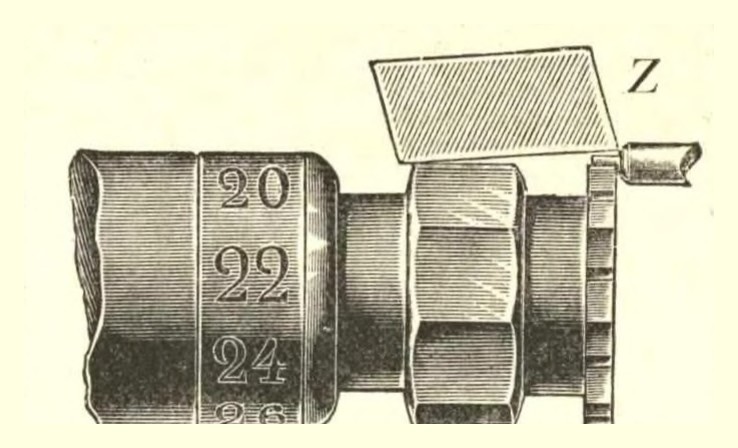
The best way to get to know a new Jacot tool, according to Schultz, is to make “gauge pivots” on it – in small steps up to about 14 Grad, the size of the largest balance jewels. These can then be used to measure jewel holes.
“Wickedly sharp”: the thumbnail test
For burnishers Schultz required at least three or four: two flat ones and one or two with rounded edges for the “trumpet” pivots, that is conical pivots, on balance staffs. One of each kind is whetted with fine but sharp emery powder and used for polishing pivots thinner. The second is whetted with the remainder, already ground fine; it serves only for repolishing.
According to Schultz, a well-whetted pivot burnisher must be wickedly sharp – in his words “scharf wie Gift”, literally “sharp as poison”. The edge of the flat burnisher that polishes the shoulder should be as sharp as a razor, even though it forms almost a right angle. The specialist workers in the Swiss watch factories tested this as follows: they laid the edge very lightly on the left thumbnail and drew it along. The edge had to bite into the rim of the nail at once – with every well-whetted burnisher, including the finer one for repolishing. From the state of a new journeyman’s burnishers, Schultz wrote, an experienced master could read a great deal about his ability.
Just as important is a perfectly flat face. If the burnisher is rounded across its width even barely noticeably, the same fault arises as on a bed that is too small: the pivot becomes thicker at the shoulder than at its end.
Whetting correctly: stroke by stroke
According to Schultz, the rounded face comes from wrong whetting. The sole of a shoe was out of the question for him anyway, and emery powder on a small wooden board also rounds the edges. A flat lead plate with emery powder is well suited. As a journeyman, Schultz himself glued together a whetstone from fine emery stones and ground it perfectly flat on a stone slab; the finest emery powder on it prevented it from becoming smooth.
It is wrong to draw the burnisher back and forth ten or twenty times like a razor. That way it always becomes rounded across its width. The right way is to make each stroke separately:
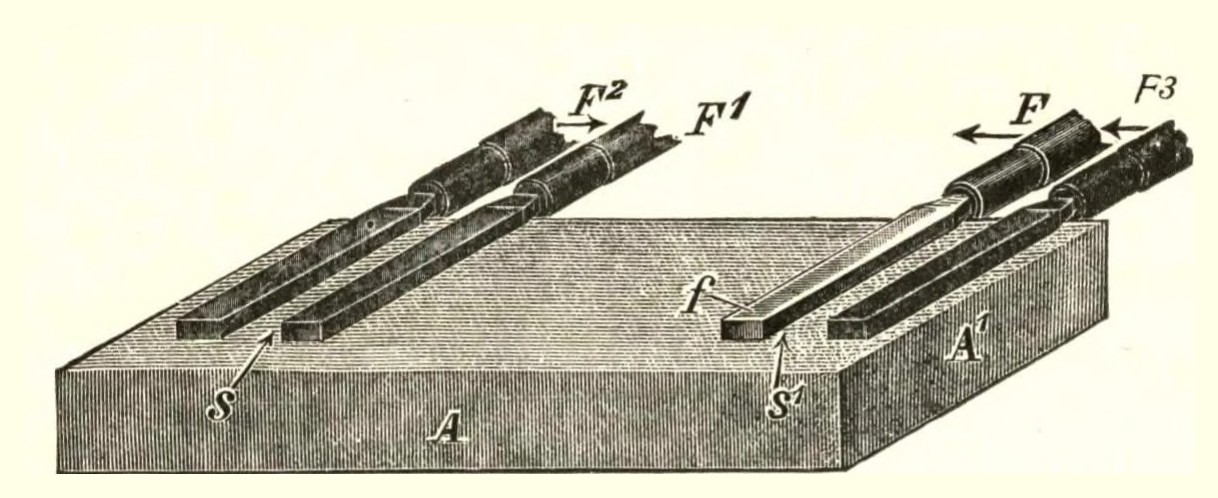
- The whetstone lies firm and without wobbling, its narrow side towards the workman.
- Lay the burnisher flat, hold the handle lightly in the right hand and press it down flat with the left thumb.
- With firm but entirely flat pressure, push it forward in one short jerk – and for the time being not back. According to Schultz, this is the “knack” that ensures an accurate face.
- A small ridge of emery powder has now formed in front of the burnisher. Set the burnisher down again beyond it and draw it back with a short jerk, then set it down afresh, and so on.
- Keep whetting until the edge is extremely sharp in the thumbnail test.
Hardness, working and storage
A soft burnisher is useless. Schultz also passed on the report of a colleague, however: his self-forged, less hard burnisher bit better than bought ones. Bought burnishers, tempered lightly to a pale yellow, then also polished better – but they must not be tempered too far, or the burnisher quickly becomes blunt on hard pivots.
For the polishing itself: the sharper the burnisher, the smaller the risk of “polishing a pivot away”, because with a blunt burnisher one works longer and presses harder. The arbor should run without binding between the bed and the rear centre, yet the shoulder should not stand noticeably away from the bed. The burnisher is moistened generously with good, fluid oil. On newly turned parts the pivot breaks off easily if it has been left too long and too thick. Schultz’s advice: before polishing, shorten it almost to length and turn it so thin that only 4 to 5 Grad remain to be polished off with a razor-sharp burnisher.
Finally, storage: never put the burnishers in the drawer among other files, or the edges become notched. Each burnisher goes into its own paper sleeve. Because the paper absorbs oil, which turns rancid, the burnisher is wiped with benzine before each use and freshly oiled.
Conclusion
A pivot can only be as good as the bed and the burnisher on which it is polished. The right bed prevents a tapered pivot, and a burnisher that passes the thumbnail test polishes quickly and without force. Anyone using a Jacot tool today will find in the shop under Machines and equipment, for example, a used Rollifit pivot burnishing tool; further historical tools are listed under Vintage watchmaker’s tools. Which other special files exist is described in the article Special files for restoration and reworking. The first part of this series dealt with the mandrel.
Source: Wilhelm Schultz, Der Uhrmacher am Werktisch, 9th edition, revised by Fr. A. Kames, Berlin 1941, pp. 104–114 (§§ 192–195, 197, 199–206, 209–213, 215–218). All the information used already appears in the 7th edition of 1924; additions made in the revisions of 1933/1941 (including § 196 carrier, § 198 burnisher profile, §§ 207–208 carborundum stones, § 214) have not been used. Quotations translated from the German by Ernst Westphal e.K.